Azure IoT C SDK Port#
Contents#
General information#
There are stored adaptations needed to run azure-iot-sdk-c on Phoenix-RTOS.
Azure IoT C Software Development Kit provides the interface to communicate easily with Azure IoT Hub, Azure IoT Central, and Azure IoT Device Provisioning. It’s intended for apps written in C99 (or newer) or C++. For more information please visit the Azure IoT C SDK GitHub.
Supported version#
The supported version is LTS_01_2022.
Quickstart for ia32-generic-qemu#
This simple guide is recommended for getting familiar with using azure_sdk on Phoenix-RTOS. You will need to have a
hub created in Azure IoT Hub and a device within it.
Each device has its connection string, which will be needed in the following instructions.
First, please build the project with the ports component and set AZURE_CONNECTION_STRING (see below):
TARGET=ia32-generic-qemu AZURE_CONNECTION_STRING="HostName=test-hub.azure-devices.net;DeviceId=ia32-generic-qemu;SharedAccessKey=xxxxxxxxx=" ./phoenix-rtos-build/build.sh clean all
Note: The connection string above is only an example, please use your own.
Note: You do not need all the ports provided for the
ia32-generic-qemutarget architecture. The necessary ports are:busybox,openssl,curlandazure_sdk. Here you can find more about building scripts.
Next, you will need an internet connection. Here is an example of how to set up a network connection on
ia32-generic-qemu:
Network setup on ia32-generic-qemu#
Note: This guide was tested on
Ubuntu 20.04 LTShost OS.
There are few steps to follow:
Create and set up
vibr0bridge on a host usingqemu-bridge-helper:Install the required package and ensure that
libvirtdis running:sudo apt-get update sudo apt-get install qemu-system-common systemctl enable libvirtd.service systemctl start libvirtd.service
Start the default network bridge, and configure it to run on startup.
sudo virsh net-autostart --network default
sudo virsh net-start --network default
After that verify that the IP range
192.168.122.1/24is reported by thevibr0bridge:ip addr show virbr0The expected output:
 virbr0: <NO-CARRIER,BROADCAST,MULTICAST,UP> mtu 1500 qdisc noqueue state DOWN group default qlen 1000
    link/ether xx:xx:xx:xx:xx:xx brd ff:ff:ff:ff:ff:ff
    inet 192.168.122.1/24 brd 192.168.122.255 scope global virbr0
       valid_lft forever preferred_lft forever
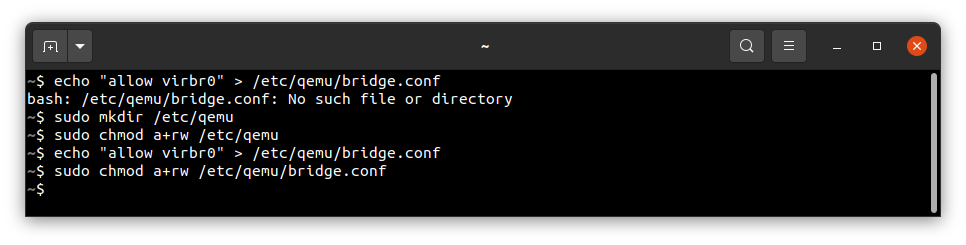
Set up
qemu-bridge-helper(chmodis used here to allow running QEMU without root privileges)echo "allow virbr0" > /etc/qemu/bridge.conf sudo chmod a+rw /etc/qemu/bridge.conf
If
/etc/qemudirectory does not exist, create it and provide required privileges:sudo mkdir /etc/qemu sudo chmod a+rw /etc/qemu echo "allow virbr0" > /etc/qemu/bridge.conf sudo chmod a+rw /etc/qemu/bridge.conf
Sources: https://apiraino.github.io/qemu-bridge-networking/, https://mike42.me/blog/2019-08-how-to-use-the-qemu-bridge-helper-on-debian-10
Launch
qemuusing a starting script withnetsuffix:./scripts/ia32-generic-qemu-net.shConfigure network and run
ash(Busybox applet) usingrcscript:Note: By default
IPis assigned usingDHCP. For other possibilities please check the configuration file located in_projects/ia32-generic-qemu/rootfs-overlay/etc/rc.conf.d/networkNote: There are other programs executed by the script. For more information please check the content of the
rcfile foria32-generic-qemuin_projects/ia32-generic-qemu/rootfs-overlay/etc/rc/linuxrcAs you can see, the advanced version of
Phoenix-RTOSwithPOSIXshell has been started: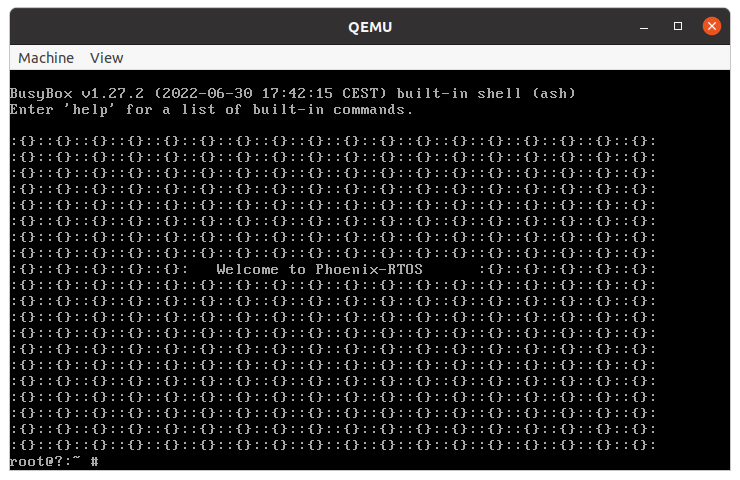
Now you can check the internet connection using the
pingapplet.To complete the configuration please set the current date using
dateapplet, like below: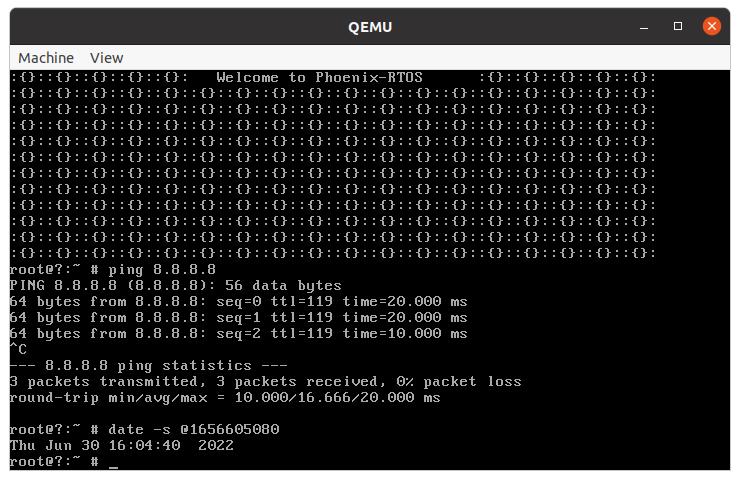
Note: The required argument entered after
@is EPOCH (POSIX time format) - you can gt it for example from here.
Running the IoThub Client sample#
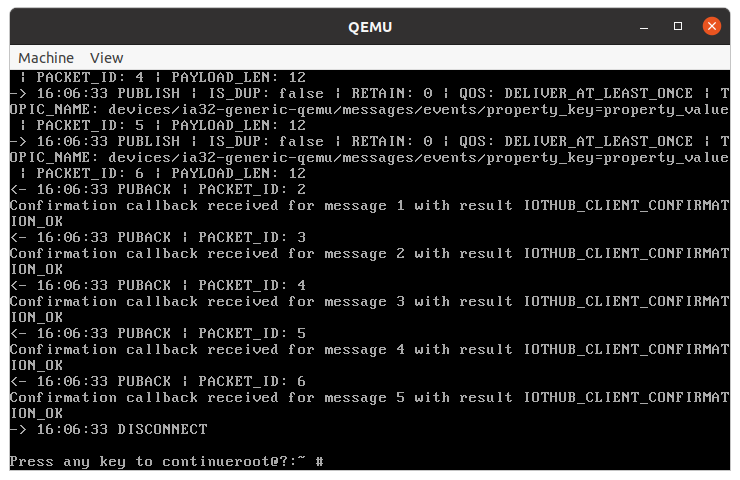
Providing that internet connection is working, and the current date is set, you can run iothub_ll_telemetry_sample:
/bin/iothub_ll_telemetry_sample
Note: The entered connection string was added to the sample’s source code. You can find it in
_build/ia32-generic-qemu/azure_sdk/azure-iot-sdk-c-lts_01_2022/iothub_client/samples/iothub_ll_telemetry_sample/iothub_ll_telemetry_sample.c.
You can read messages received from Azure, for example using AzureIotHub VS Code Extension by clicking
Start Monitoring Built-in Event Endpoint:
[IoTHubMonitor] [6:07:21 PM] Message received from [ia32-generic-qemu]:
"test_message"
[IoTHubMonitor] [6:07:21 PM] Message received from [ia32-generic-qemu]:
"test_message"
[IoTHubMonitor] [6:07:21 PM] Message received from [ia32-generic-qemu]:
"test_message"
[IoTHubMonitor] [6:07:21 PM] Message received from [ia32-generic-qemu]:
"test_message"
[IoTHubMonitor] [6:07:21 PM] Message received from [ia32-generic-qemu]:
"test_message"
Using azure-iot-sdk-c#
The above guide shows how to run only one of the provided samples. To write your own programs using the SDK please read
the following instructions. It may be helpful for other architectures, like armv7m7-imxrt106x-evk, where the
previously generated sample may not work. That’s the reason, why the following example is adjusted to the configuration
with mbedtls intended for ‘smaller’ targets (now only the imxrt106x is supported). If you want to write your own
programs intended for the openssl configuration (‘larger’ targets, like ia32-generic-qemu) there will be a few
differences, e.g. there is no need for setting the certificate in code and increasing the stack size in Makefile.
To use functions provided by azure-iot-sdk-c please append specific azure libraries (and possibly mbedtls
libraries) to LIBS variable in Makefile and include the required header file. Below is an example of a simple
program similar to iothub_client_ll_telemetry_sample. You can place it for example in the _user directory:
Note: The SDK was tested for the
armv7m7-imxrt106xtarget architecture with thembedtlsport, but remember that internet connection and the current date also have to be provided.Makefile - linking with Azure SDK and mbedtls libraries.
NAME := sample
LOCAL_SRCS := main.c
LIBS := libiothub_client libiothub_client_mqtt_transport libumqtt libaziotsharedutil libmbedtls libmbedx509 libmbedcrypto
LDFLAGS += -z stack-size=12288

include $(binary.mk)
Source code:
#include "iothub.h"
#include "iothub_device_client_ll.h"
#include "iothub_client_options.h"
#include "iothub_message.h"
#include "iothubtransportmqtt.h"
#include "azure_c_shared_utility/threadapi.h"
#include "azure_c_shared_utility/crt_abstractions.h"
#include "azure_c_shared_utility/shared_util_options.h"


/* Paste here your connection string from IotHub device */
#define AZURE_CONNECTION_STRING "HostName=test-hub.azure-devices.net;DeviceId=ia32-generic-qemu;SharedAccessKey=xxxxxxxxx="


static unsigned long msgConfirmations = 0;


/* Baltimore public certificate */
static const unsigned char cert[] = {
    "-----BEGIN CERTIFICATE-----\r\n"
    "MIIDdzCCAl+gAwIBAgIEAgAAuTANBgkqhkiG9w0BAQUFADBaMQswCQYDVQQGEwJJ\r\n"
    "RTESMBAGA1UEChMJQmFsdGltb3JlMRMwEQYDVQQLEwpDeWJlclRydXN0MSIwIAYD\r\n"
    "VQQDExlCYWx0aW1vcmUgQ3liZXJUcnVzdCBSb290MB4XDTAwMDUxMjE4NDYwMFoX\r\n"
    "DTI1MDUxMjIzNTkwMFowWjELMAkGA1UEBhMCSUUxEjAQBgNVBAoTCUJhbHRpbW9y\r\n"
    "ZTETMBEGA1UECxMKQ3liZXJUcnVzdDEiMCAGA1UEAxMZQmFsdGltb3JlIEN5YmVy\r\n"
    "VHJ1c3QgUm9vdDCCASIwDQYJKoZIhvcNAQEBBQADggEPADCCAQoCggEBAKMEuyKr\r\n"
    "mD1X6CZymrV51Cni4eiVgLGw41uOKymaZN+hXe2wCQVt2yguzmKiYv60iNoS6zjr\r\n"
    "IZ3AQSsBUnuId9Mcj8e6uYi1agnnc+gRQKfRzMpijS3ljwumUNKoUMMo6vWrJYeK\r\n"
    "mpYcqWe4PwzV9/lSEy/CG9VwcPCPwBLKBsua4dnKM3p31vjsufFoREJIE9LAwqSu\r\n"
    "XmD+tqYF/LTdB1kC1FkYmGP1pWPgkAx9XbIGevOF6uvUA65ehD5f/xXtabz5OTZy\r\n"
    "dc93Uk3zyZAsuT3lySNTPx8kmCFcB5kpvcY67Oduhjprl3RjM71oGDHweI12v/ye\r\n"
    "jl0qhqdNkNwnGjkCAwEAAaNFMEMwHQYDVR0OBBYEFOWdWTCCR1jMrPoIVDaGezq1\r\n"
    "BE3wMBIGA1UdEwEB/wQIMAYBAf8CAQMwDgYDVR0PAQH/BAQDAgEGMA0GCSqGSIb3\r\n"
    "DQEBBQUAA4IBAQCFDF2O5G9RaEIFoN27TyclhAO992T9Ldcw46QQF+vaKSm2eT92\r\n"
    "9hkTI7gQCvlYpNRhcL0EYWoSihfVCr3FvDB81ukMJY2GQE/szKN+OMY3EU/t3Wgx\r\n"
    "jkzSswF07r51XgdIGn9w/xZchMB5hbgF/X++ZRGjD8ACtPhSNzkE1akxehi/oCr0\r\n"
    "Epn3o0WC4zxe9Z2etciefC7IpJ5OCBRLbf1wbWsaY71k5h+3zvDyny67G7fyUIhz\r\n"
    "ksLi4xaNmjICq44Y3ekQEe5+NauQrz4wlHrQMz2nZQ/1/I6eYs9HRCwBXbsdtTLS\r\n"
    "R9I4LtD+gdwyah617jzV/OeBHRnDJELqYzmp\r\n"
    "-----END CERTIFICATE-----\r\n"
    " "
};


static void azure_sendConfirmCallback(IOTHUB_CLIENT_CONFIRMATION_RESULT result, void *userContextCallback)
{
  (void)userContextCallback;
  /* When a message is sent this callback will get invoked */
  msgConfirmations++;
  printf("Confirmation callback received for message %lu with result %s\r\n", (unsigned long)msgConfirmations, MU_ENUM_TO_STRING(IOTHUB_CLIENT_CONFIRMATION_RESULT, result));
}


static void azure_connectionStatusCallback(IOTHUB_CLIENT_CONNECTION_STATUS result, IOTHUB_CLIENT_CONNECTION_STATUS_REASON reason, void *user_context)
{
  (void)reason;
  (void)user_context;
  /* It doesn't take into consideration network outages */
  if (result == IOTHUB_CLIENT_CONNECTION_AUTHENTICATED) {
    printf("The device client is connected to iothub\r\n");
  }
  else {

    printf("The device client has been disconnected\r\n");
  }
}


int azure_sendMsg(IOTHUB_DEVICE_CLIENT_LL_HANDLE *devhandle, const char *msg)
{
  IOTHUB_MESSAGE_HANDLE msghandle;
  unsigned long messagesSent = 0;
  bool running = true;
  msgConfirmations = 0;
  do {
    if (messagesSent < 1) {
      msghandle = IoTHubMessage_CreateFromString(msg);
      IoTHubMessage_SetProperty(msghandle, "property_key", "property_value");
      printf("Sending the following message to IoTHub: %s\n", msg);
      IoTHubDeviceClient_LL_SendEventAsync(*devhandle, msghandle, azure_sendConfirmCallback, NULL);
      /* The message is copied to the sdk so the we can destroy it */
      IoTHubMessage_Destroy(msghandle);
      messagesSent++;
    }
    else if (msgConfirmations >= 1) {
      /* After all messages are all received stop running */
      running = false;
    }
    IoTHubDeviceClient_LL_DoWork(*devhandle);
    ThreadAPI_Sleep(1);
  } while (running);
  printf("The message sent properly\n");
  return 0;
}


int azure_open(const char *connectionString, const unsigned char *cert, IOTHUB_DEVICE_CLIENT_LL_HANDLE *devhandle)
{
  IOTHUB_CLIENT_TRANSPORT_PROVIDER protocol;
  protocol = MQTT_Protocol;
  printf("Creating IoTHub Device handle\r\n");
  *devhandle = IoTHubDeviceClient_LL_CreateFromConnectionString(connectionString, protocol);
  if (*devhandle == NULL) {
    fprintf(stderr, "Failure creating IotHub device. Hint: Check your connection string.\n");
    return 1;
  }
  IoTHubDeviceClient_LL_SetOption(*devhandle, OPTION_TRUSTED_CERT, cert);
  bool urlEncodeOn = true;
  IoTHubDeviceClient_LL_SetOption(*devhandle, OPTION_AUTO_URL_ENCODE_DECODE, &urlEncodeOn);
  /* Setting connection status callback to get indication of connection to iothub */
  IoTHubDeviceClient_LL_SetConnectionStatusCallback(*devhandle, azure_connectionStatusCallback, NULL);
  return 0;
}


static void azure_close(IOTHUB_DEVICE_CLIENT_LL_HANDLE *devhandle)
{
  IoTHubDeviceClient_LL_Destroy(*devhandle);
}


static void azure_deinit(void)
{
  IoTHub_Deinit();
}


static void azure_init(void)
{
  IoTHub_Init();
}


int main(void)
{
    IOTHUB_DEVICE_CLIENT_LL_HANDLE devhandle;

    azure_init();
    azure_open(AZURE_CONNECTION_STRING, cert, &devhandle);

    azure_sendMsg(&devhandle, "test message");

    azure_close(&devhandle);
    azure_deinit();

    return 0;
}
Note: Please remember that
PORTS_AZURE_SDKand environment variables for other required ports should be set toyin the specific building script in_projectsdirectory or using an environment variable.
Running tests#
To build azure_sdk tests please set LONG_TEST=y environment variable before calling build.sh.
In the result, unit tests for the c-utility component should be placed in the /bin directory.
The tests have ut_exe suffix, for example: connectionstringparser_ut_exe. You run it as follows:
/bin/connectionstringparser_ut_exe
Known bugs#
None